Utilizing the Rectangular Marquee Tool in Photoshop
The Rectangular Marquee Tool is one of the simplest and most valuable tools in Photoshop. It assists you with choosing rectangular or square region of a picture. You can involve it for some undertakings like trimming, altering explicit regions, or making shapes. We should dive more deeply into this tool and how to really utilize it.
What is the Rectangular Marquee Tool?
The Rectangular Marquee Tool permits you to draw square shapes or squares on your picture. You can choose portions of the picture to alter, make straightforward shapes, or feature regions where you need to adapt. It is an essential instrument, however it tends to be extremely strong when utilized accurately.
Where to Track down It
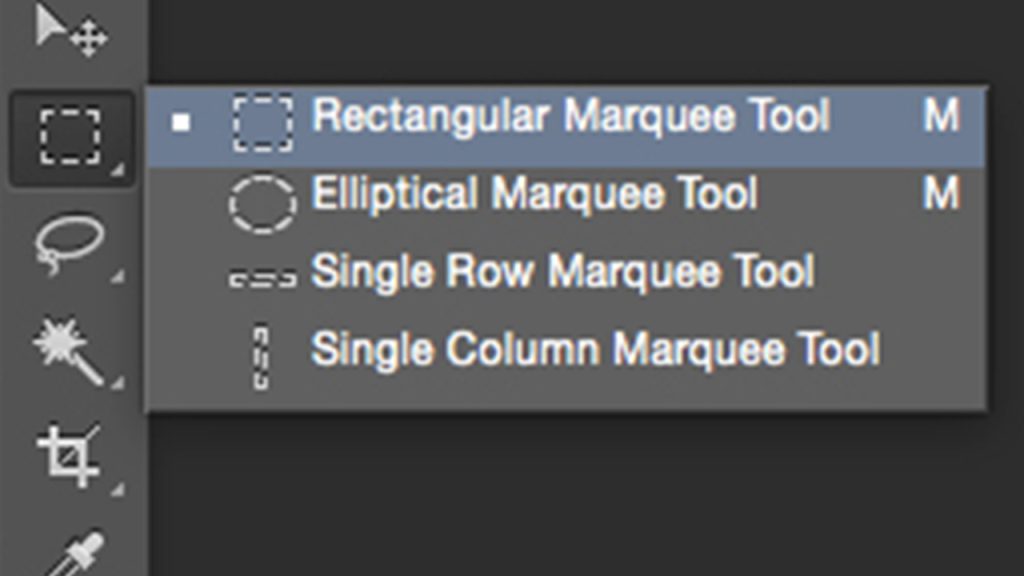
You can find the Rectangular Marquee Tool in the toolbar on the left half of the screen. Its symbol seems to be a run square shape. To choose it rapidly, press M on your console. On the off chance that the Circular Marquee Instrument is chosen all things being equal, press Shift + M to change back to the Rectangular Marquee Tool.
Step by step instructions to Utilize the Rectangular Marquee Tool
Here are the basic moves toward utilize this instrument:
Select the Tool: Snap on the Rectangular Marquee Tool in the toolbar or press M on your console.
Draw a Square shape: Snap and drag your mouse on the picture to draw a rectangular shape. Discharge the mouse button when you are content with the size and position.
Draw an Ideal Square: to draw an ideal square, hold down the Shift key while hauling your mouse.
Move the Determination: In the wake of drawing a choice, click inside the choice region and drag it to move it to an alternate position. To change the situation while drawing, hold down the Spacebar and move your mouse.
Deselect or Reselect: To eliminate the choice, press Ctrl + D (Windows) or Cmd + D (Macintosh). To bring back the last choice, press Ctrl + Shift + D (Windows) or Cmd + Shift + D (Macintosh).
Tips for Improved Results
To take full advantage of the Rectangular Marquee Instrument, follow these tips:
Use Plume for Delicate Edges: Assuming you need delicate, foggy edges for your choice, utilize the Quill choice at the top menu. This is perfect for mixing your determination into the remainder of the picture.
Add or Deduct Choices:
To add more regions to your determination, hold down the Shift key and draw another square shape.
To eliminate portions of your determination, hold down the Alt key (Windows) or Choice key (Macintosh) and draw over the undesirable region.
Snap to Guides or Matrices: You can adjust your choice to guides, lattices, or report edges by empowering snapping. Go to View > Snap To and pick the choices you need to snap to.
Join with Different Tooles: You can utilize the Rectangular Marquee Tool alongside different instruments, similar to the Tether Tool, to make more intricate determinations.
Normal Purposes
Here are a typical ways of utilizing the Rectangular Marquee Tool in Photoshop:
Trimming a Segment: Select the piece of a picture you need to edit or alter.
Making Casings or Lines: Utilize the instrument to draw square shapes and make edges or boundaries for your plans.
Altering Explicit Regions: Apply changes like brilliance, difference, or variety acclimations to only one piece of the picture.
Plan Components: Make essential shapes or blocks of variety for your visual depiction projects.
Contemplation
The Rectangular Marquee Tool is easy to utilize, but at the same time it’s extremely adaptable. You can involve it for essential assignments like editing or more innovative ones like planning shapes and casings. With just the right amount of training, this tool will turn into a significant piece of your Photoshop abilities. Check it out and perceive how it helps make your tasks quicker and simpler!