Grasping the Sharpen Tool in Photoshop
The Sharpen Tool in Photoshop is a direct anyway valuable resource that helps you with making your photos look more understood and more positive. Assuming that you have a dim photo or have to work on the point of convergence of express bits of an image, the Sharpen Instrument can help you with achieving that. It’s easy to use, and with several snaps, you can chip away at the sharpness of your photos or plans. We ought to hop into what the Sharpen Contraption does, how to use it, and a couple of clues to help you with stop by the best results.
How Does the Sharpen Tool Respond?
The Sharpen Tool is used to grow the clearness and sharpness of an image by redesigning the edges of articles or nuances. Right when you use the Sharpen Tool, it works on the separation among light and faint areas at the edges of articles, making them appear more portrayed. Detest the Unsharp Cover or other sharpening diverts in Photoshop that sharpen the whole picture. Taking everything into account, the Sharpen Mechanical assembly grants you to target unequivocal district of your photo, which provides you more control over which parts get more sharpened.
The best technique to Use the Sharpen Tool
Here is a direct helper on the most capable technique to use the Sharpen Tool in Photoshop:
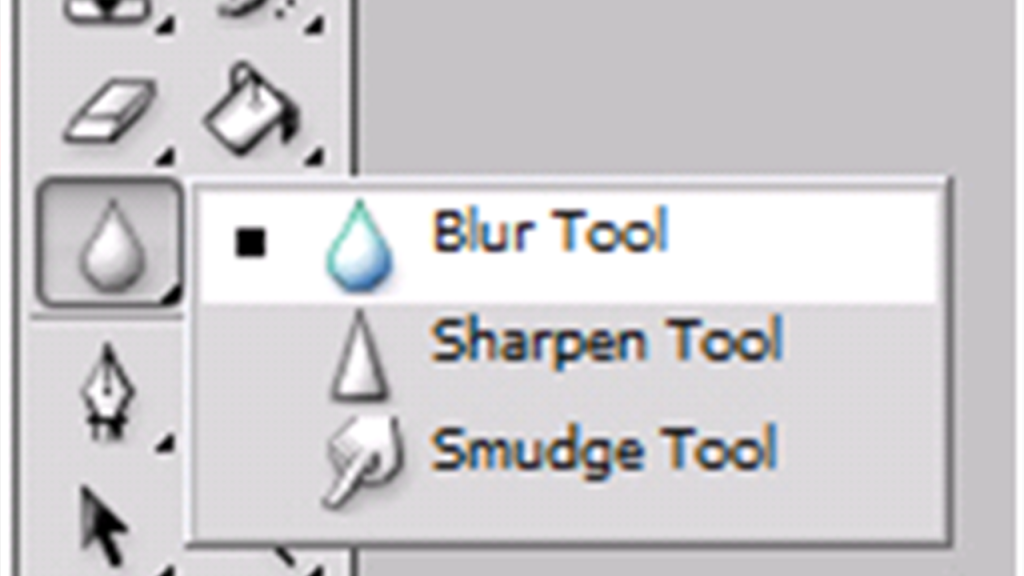
Select the Sharpen Tool: Open your image in Photoshop. To pick the Sharpen Tool, go to the toolbar on the left and quest for the image that is by all accounts a triangle with a spot in the center (it might be assembled with the Sully Tool or Dark Instrument). In case you don’t see it, snap and hold the Smear Tool, and a menu will appear with the Sharpen Instrument decision.
Change the Brush Settings: In the top decisions bar, you can change the size of the brush and its hardness. A more unassuming brush size is important for sharpening more humble nuances, while a greater brush is better for more noteworthy districts. You can in like manner change the strength of the sharpening influence by changing the Strength setting. A lower strength (like 25%) will apply a subtle sharpening influence, while a higher strength (like 100%) will have the effect more serious.
Start Sharpening: At whatever point you’ve picked the tool and changed the settings, snap and drag the Sharpen Instrument over the district of your image that you really want to sharpen. You can conceal edges or nuances that need greater lucidity of psyche. Each time you move the tool over an area, the sharpness will increase, making the nuances stand separated more.
Zoom In for Better Precision: Accepting at least for now that you’re sharpening fine nuances, it can help with zeroing in on your image. Thusly, you can see the results even more obviously and do whatever it takes not to over-sharpen areas that don’t need it.
Fix Stumbles: If you incidentally sharpen something to a limit, you can fix the movement by pressing Ctrl + Z (Windows) or Cmd + Z (Mac). You can similarly reduce the effect by using the Arrangement of encounters Brush Tool or by applying the Sharpen Tool with lower strength.
Ways of using the Sharpen Mechanical assembly
Use the Right Brush Size: Pick a brush size that fits the district you’re managing. A more unobtrusive brush is great for sharpening nuances like eyes, hair, or text, while a greater brush ends up being better for more noteworthy districts like the establishment or scene.
Change the Strength: Be careful so as not to overdo it. If the strength is unreasonably high, you could get a severe, unnatural look. Start with a low strength (around 25%-half) and bit by bit increase it to see what the mean for manages your image.
Zoom In for Exactness: Zooming in will help you with focusing in on little nuances and assurance you’re sharpening definitively where it’s expected, without impacting the rest of the image.
Use with Layers: To make non-grievous adjusts, duplicate your layer before using the Sharpen Tool. Thusly, you can continually return and change accepting that you feel the sharpness is unnecessarily or unreasonably little.
Sharpen With some restriction: From time to time hushing up would be ideal. Sharpening a photo a ton of can cause upheaval or grainy surfaces, especially in districts with sensitive changes like skies or shadows. Apply the sharpening influence consistently and carefully to keep the image looking customary.
When to Use the Sharpen Contraption
The Sharpen Mechanical assembly is useful overall, for instance,
Chipping away at Hazy Photos: If your photo is to some degree out of fixation, you can use the Sharpen Mechanical assembly to bring back some clarity, especially in the nuances.
Redesigning Express Nuances: Need to make the eyes pop in an image or work on the outer layer of a surface or scene? The Sharpen Tool grants you to target and sharpen these specific nuances.
Refining Edges: If you’ve made an arrangement or portrayal, you can use the Sharpen Tool to refine the edges of things, making them stand separated all the more doubtlessly.
Conclusion
The Sharpen Tool in Photoshop is a remarkable strategy for making unequivocal locale of your image all the more clear and more organized. It’s easy to use and gives you the control to sharpen only the parts that need it, without affecting the entire photo. Whether you’re managing a portrayal, a scene, or another sort of picture, the Sharpen Tool can help you with working on the nuances and make your image look more cleaned. Basically try to use it gently and with some limitation, and your photos will look new and clear!